Learning Flutter and how to start using the Provider package
May 26, 2020 / 6 min read

Creating a functional mobile app in Flutter is a breeze for experienced developers. But once we start adding features, things get more complex. In this blog post, I will share how to avoid some common state management pitfalls and how the Provider package can help.
I’m a back-end developer who often thought about creating my own mobile app. But as a father of three, I don’t have much time to learn new languages and frameworks. When I had the opportunity to create a small internal app for foreign travel reimbursements at NoA Ignite, I decided to give it a go. I tried Flutter, and it turned out that it was exactly what I was looking for.
Flutter is astonishingly easy to use if you’re an experienced back-end developer. The coding was fun and I was able to deliver a working prototype very quickly. Having said that, I did run into some state management pitfalls along the way. I hope that this post can help other developers learning Flutter to be more aware of the issues and possible solutions.

Flutter’s tutorials explain that everything is a widget – either a very simple stateless widget or a more complex stateful widget.
Stateful widgets are well demonstrated by the example code provided by the project wizard. In simple words:
The state is kept within the properties of your widget, inheriting the StatefulWidget class. Whenever the UI needs a rebuild, a setState() method is called.
No cookies, no video
You can't see this video because your ad blocker doesn't allow displaying a cookie banner, the acceptance of which is necessary to view this video. You can disable the ad blocker in the browser's extensions list or, if you have an ad blocker installed as a separate app on your device, in the app's settings.
After understanding how it works and creating a few stateful widgets, it all seemed pretty straightforward to me. However, there is a catch. When my codebase started to grow, several challenges and questions appeared:
- How does multiple stateful widgets interact with each other?
- Is it possible to nest a stateful widget inside another stateful widget?
- Can a state be shared between multiple widgets?
- How do you make sure that the UI refreshes only the affected parts of the screen?
As my code started to look awkward, I searched for solutions online.
I was not surprised to find that the problem is well-known in the Flutter community, and I found several different approaches and packages. Here is a list of some of them with a brief description and their advantages and disadvantages:
InheritedWidget
- + built-in approach
- - requires a lot of boilerplate code even for very simple tasks
BLoC
- + very powerful
- - hard to learn
- - requires knowledge of RxDart
ScopedModel
- + straightforward
- - limited functionality
- - project stalled since Nov 2018
- - not recommended by the community at this moment
Provider
- + based on ScopedModel but more powerful
- + recommended by the community
- + used by Flutter’s development team
- - a bit harder to learn than ScopedModel
I started to feel overwhelmed. I’m not a fan of overcomplicated code and prefer to learn step by step.
The package recommended by the Flutter development team is Provider, and I will try to explain it here with a simple use case.
Here is an example of a UI element purposed to set font-weight.
No cookies, no video
You can't see this video because your ad blocker doesn't allow displaying a cookie banner, the acceptance of which is necessary to view this video. You can disable the ad blocker in the browser's extensions list or, if you have an ad blocker installed as a separate app on your device, in the app's settings.
import  'package:flutter/material.dart';

class FontWeightSwitch  extends StatefulWidget {
    @override
    State<StatefulWidget> createState() {
        return FontSizeSwitchState();
    }
}
class  FontSizeSwitchState  extends State<FontSizeSwitch> {
    bool boldEnabled =  false;
    @override
    Widget build(BuildContext context) {
        return Row(
            mainAxisAlignment: MainAxisAlignment.spaceEvenly,
            children: <Widget>[
                Text(
                    "Bold Font",
                    style: TextStyle(fontWeight: boldEnabled ? FontWeight.bold
                    : FontWeight.normal),
                ),
                Switch(value: boldEnabled, onChange: onChanged)
            ],
        );
    }

    void onChanged(bool newValue) {
        setState(() {
            boldEnabled = newValue;
        });
    }
}
This is a straightforward stateful widget. The state is kept inside the property and everything works like a charm. Similarly, we can add another one for the font size.
No cookies, no video
You can't see this video because your ad blocker doesn't allow displaying a cookie banner, the acceptance of which is necessary to view this video. You can disable the ad blocker in the browser's extensions list or, if you have an ad blocker installed as a separate app on your device, in the app's settings.
import 'package:flutter/material.dart';
class  FontSizeSwitch  extends StatefulWidget {
    @override
    State<StatefulWidget> createState() {
       return FontSizeSwitchState();
    }
}
class FontSizeSwitchState extends State<FontSizeSwitch> {
    double fontSize = 14.0;

    @override
    Widget build(BuildContext context) {
      return Row(
        mainAxisAlignment: MainAxisAlignment.spaceBetween,
        children:<Widget>[
          Text(
            "Font Size",
            style: TextStyle(fontSize: fontSize),
          ),
          Slider(
            value: fontSize,
            onChanged: onChanged,
            min:10.0,
            max:20.0,
            divisions:5,
            label: fontSize.toString(),
          )
        ],
      );
    }

    void onChanged(double newValue) {
      setState(() {
        fontSize = newValue;
    });
  }
}
The above approach is simple and just enough for me. Each of the widgets has its own state.
This type of state can be described as an Ephemeral State or Local State. However, what if the goal is to have one widget interact with the other in the following manner?
No cookies, no video
You can't see this video because your ad blocker doesn't allow displaying a cookie banner, the acceptance of which is necessary to view this video. You can disable the ad blocker in the browser's extensions list or, if you have an ad blocker installed as a separate app on your device, in the app's settings.
Our instinct may tell us that a change in one of the widgets would trigger some kind of update in the other, or maybe pass callbacks back and forth. But this is not the correct approach for declarative UI frameworks like Flutter. It can be made to work, but then the code becomes messy and awkward. As developers, we need to work with the framework and not against it.
If you take the time to think about it, you will realise that the right solution is to lift up the state.
The font weight and font size are user preferences. Such settings are global for the whole app and not only for one widget. This type of state is called app state or global state – it is no longer a local state.
Here’s an example of how you can code it with the Provider package:
import 'package:flutter/material.dart';
import 'package:provider/provider.dart';
import 'state_management/settings/user_settings.dart';
class  FontWeightSwitch  extends StatelessWidget {
    @override
    Widget build(BuildContext context) {
        var userSettings = Provider.of<UserSettings>(context);
        return Row(
            mainAxisAlignment: MainAxisAlignment.spaceBetween,
            children: <Widget>[
                Text(
                    "Bold Font",
                    style: userSettings.textStyle
                ),
                Switch(
                    value: userSettings.boldFont,
                    onChanged: (bool newValue) {
                          userSettings.setBoldFont(newValue);
                    },
                )
            ],
        );
    }
}
import 'package:flutter/material.dart';
class UserSettings with ChangeNotifier {
    double _fontSize =  14.0;
    double get fontSize => _fontSize;
    void setFontSize(double newValue) {
        _fontSize = newValue;
        notifyListeners();
    }

    bool _boldFont =  false;
    bool get boldFont => _boldFont;
    void setBoldFont(bool newValue) {
        _boldFont = newValue;
        notifyListeners();
    }

    TextStyle get textStyle {
        return TextStyle(
            fontWeight: boldFont ? FontWeight.bold : FontWeight.normal,
            fontSize: _fontSize
        );
    }
}
First we introduce the UserSettings class. It contains user preferences and extends the ChangeNotifier.
All public setters call notifyListeners() to inform the UI that a rebuild should be triggered.
The widget becomes stateless and all changing elements are provided by the instance of Settings.
A call to the Provider.of method is crucial to access the object. The second widget is handled in the same way.
import 'package:flutter/material.dart';
import 'package:provider/provider.dart';
import 'state_management/settings/user_settings.dart';
class FontSizeSwitch extends StatelessWidget {
    @override
    Widget build(BuildContext context) {
        var userSettings = Provider.of<UserSettings>(context);

        return Row(
            mainAxisAlignment: MainAxisAlignment.spaceBetween,
            children: <Widget>[
                Text(
                    "Font Size",
                    style: userSettings.textStyle
                ),
                Slider(
                    value: userSettings.fontSize,
                    onChanged: (double newValue) {
                          userSettings.setFontSize(newValue);
                    },
                    min: 10.0,
                    max: 20.0,
                    divisions: 5,
                    label: userSettings.fontSize.toString(),
                )
            ],
        );
    }
}
Finally, to make it work, ChangeNotifierProvider wraps around our widget tree. This is where the instance of Settings class is created. This allows Provider.of calls to work properly and access the instance in all child widgets.
import 'package:flutter/material.dart';
import 'package:provider/provider.dart';
import 'state_management/font_size_switch.dart';
import 'state_management/font_weight_switch.dart';
import 'state_management/settings/user_settings.dart';
void main() => runApp(MyApp());

class MyApp extends StatelessWidget {
    @override
    Widget build(BuildContext context) {
        return ChangeNotifierProvider(
            create: (_) => UserSettings(),
            child: MaterialApp(
                theme: ThemeData(
                    primarySwatch: Colors.blue,
                ),
                home: MyHomePage(title: 'Settings'),
            ),
        );
    }
}
class MyHomePage extends StatelessWidget {
    MyHomePage({Key key, this.title}) : super(key: key);
    final String title;

    @override
    Widget build(BuildContext context) {
        return Scaffold(
            appBar: AppBar(
                title: Text(title),
            ),
            body: Padding(
                padding: EdgeInsets.all(20.0),
                child: ListView(
                    children: <Widget>[
                        Divider(),
                        FontWeightSwitch(),
                        Divider(),
                        FontSizeSwitch(),
                        Divider(),
                    ],
                ),
            ),
        );
    }
}
The above code demonstrates how to start working with Provider.
However, the package is even more powerful. Let me just mention MultiProvider that can replace ChangeNotifierProvider and allow several classes similar to Settings.
This could be a shopping cart, for example, whose contents look clearly as a separate App State. I strongly recommend getting to know the Provider package here [ https://pub.dev/packages/provider].
For small or simple apps, it is enough to use the local state and built-in StatefulWidget mechanism. For more complex apps, Provider is probably the way to go, even if there are no clear guidelines. Some developers start with a simple local state and refactor to Provider when the codebase grows. Others prefer to come up with a complete architecture upfront.
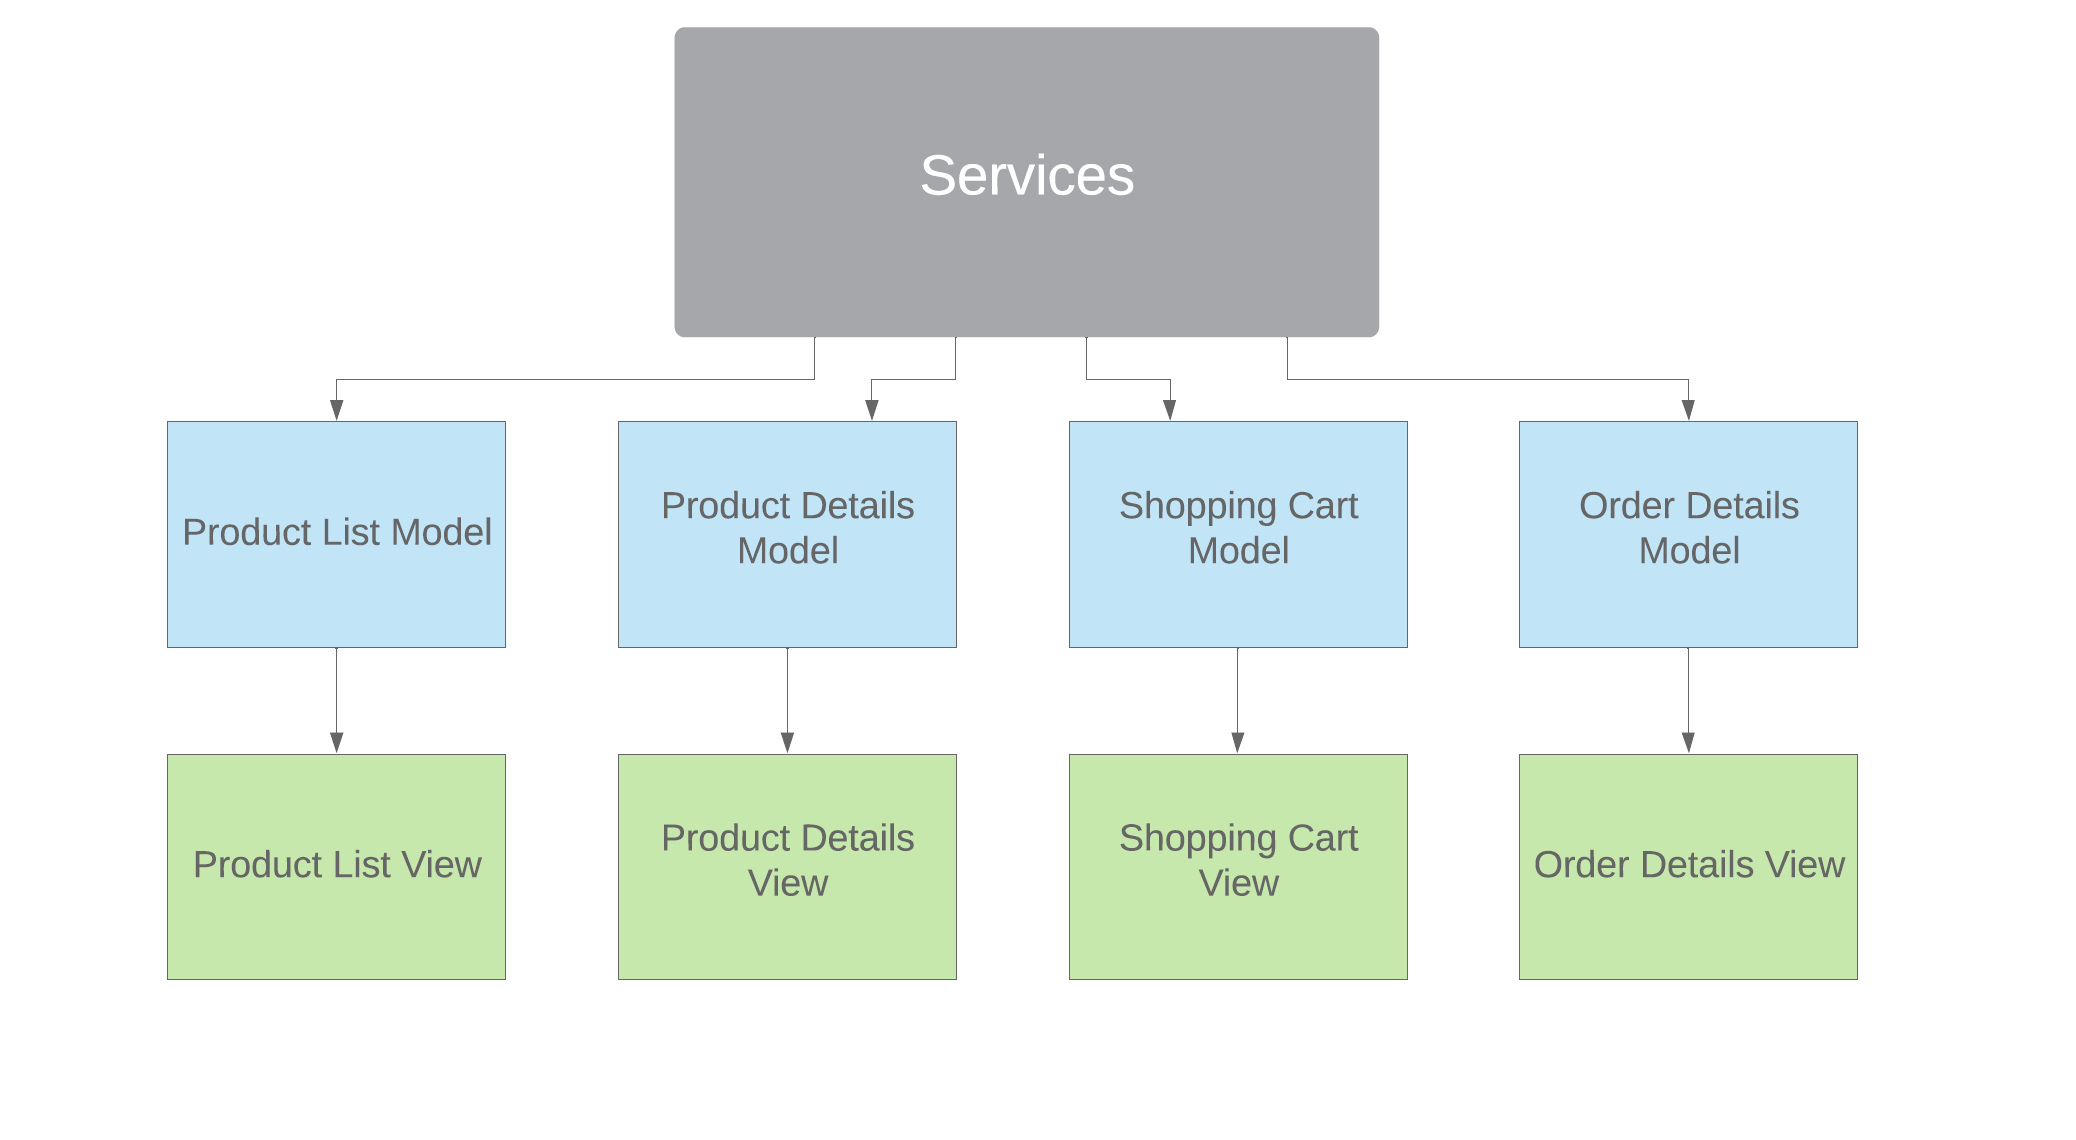
One approach is to create a separate Provider Model for each view of the app. Let's take an example of a very simple e-commerce app with the following screens:
- Product List
- Product Details
- Shopping Cart
- Order Details
Following this method, a corresponding model for each should be created:
- Product List Model
- Product Details Model
- Shopping Cart Model
- Order Details Model
The models would use services like OrderService or SearchService to handle all logic. This seems a good way to separate the UI layer from the data model and application logic.
Conclusion: A timesaver for Flutter beginners
To sum it all up, there are different ways to design state management in a Flutter app, and different ways to solve the same problem. I hope that this short overview has made you more aware of the choices you have.
I found the Provider package the most helpful solution and recommend that you check it out! Especially if you don't have much time to learn new languages and frameworks 😊
This article was edited by Anja Wedberg.
Author

Krzysztof Dąbrowski
Expert .NET Developer
With over 17 years of professional experience in .NET and 14 years of experience in Episerver CMS (Optimizely Content Cloud) in the finance, public and ecommerce sectors, Krszystof has become a pillar of our team. Today, he’s responsible for advising on solutions and architecture and strengthening programming skills within the company.
Related articles
![Female hands, laptop, working]()
July 26, 2024 / 10 min read
Everything you need to know about Optimizely Data Platform
This guide covers how Optimizely Data Platform (ODP) can improve your business with real-time customer insights, personalised campaigns, and simple data integration and will give you...
![Opal in Optimizely One screen]()
June 26, 2024 / 3 min read
Discovering the AI capabilities of Optimizely One
Not sure how Opal can support your business strategy? This article explains its functionalities and how to use them effectively.


