
Table of contents
- Based on a true story
- Understanding the customer's site initial configuration
- Architecture assessment and modifications
- Conversion basics
- ADFS + Sharepoint = Misalliance?
- Convert all users and groups login names to SAML encoding
- People picker, why it does literally find everything?
- Granting permissions to users "does not work"
- Users lost access to their mysites or have new mysites
- Search is not crawling
- Adding tasks to Sharepoint list from Outlook 2010 is not working
- Keywords are gone on all lists
- Is that all?
- Reference materials
Ins and outs of converting SharePoint 2010 classic Windows authentication solutions to claims-based trusted identity provider (with ADFS as an example). Ready solutions to problems you may face, selected issues discussed which in author’s opinion are not well documented on web.
Based on a true story
A lot has been written to address the problem of setting up SharePoint 2010 in claims-based authentication. Twice as much has been blogged regarding hooking it up with Active Directory Federation Services (ADFS). There are also a few sources describing conversion from classic Windows to claims-based authentication. However, there is very little said about issues you will most probably face during the conversion process itself.
One of NoA Ignite customers is the Norwegian Red Cross. They are a huge organization using a complex Intranet solution called Korsveien. As the first step to SharePoint 2013 upgrade, the migration from Windows classic to claims-based authentication was needed.
We had many challenges within the Red Cross project. I have run into multiple obstacles myself, also when applying ADFS as trusted identity provider. That was not a trivial case for sure. Our team used NoA Ignite SharePoint Department‘s expertise, also other colleagues became an invaluable source of help during the whole process.
I’d like to share some of our experiences with you from that project. So, let’s have a brief look at most important steps of the migration and configuration for the Norwegian Red Cross.
Understanding the customer's site initial configuration
Being a part of an interesting project with creative and enthusiastic atmosphere is always a real pleasure. I worked together with the Red Cross team directly on site for few months. Met great, passionate people there, who were very eager to make things going in the right direction. At the very beginning it was important to understand how the customer site worked. Close on-site collaboration was the key to get a technical acumen of Korsveien.
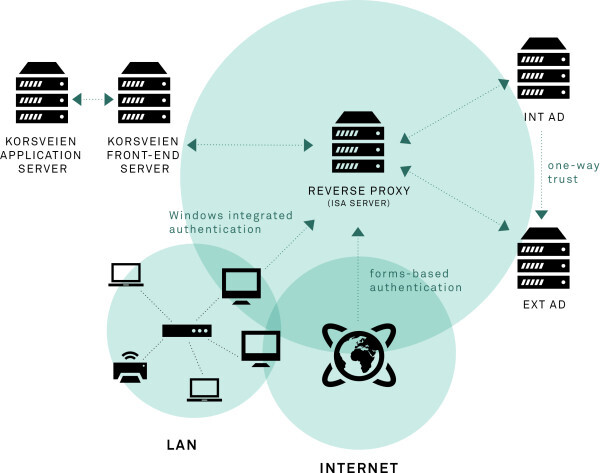
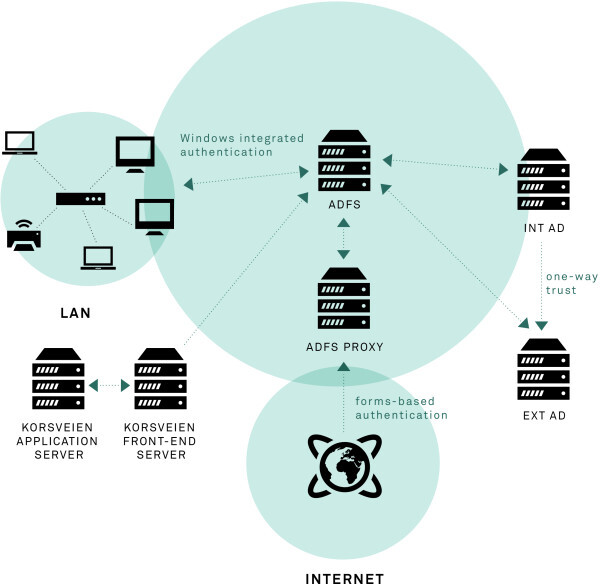
Architecture assessment and modifications
There were many reasons that led to a slightly modified architecture. The most important were: re-design forgot password procedure, resign from old ISA solution, apply ADFS. We had several conversations with people from NoA Ignite that are experienced in networking solutions to design and apply best architecture possible based on client’s requirements, policy limitations etc.
So the key modifications were:
- replace ISA server with Active Directory Federation Services (ADFS)
- add ADFS proxy to enable forms-based authentication for external users
- redesign of standard ADFS forms-based login page
– new layoutadded possibility to log in with AD attributes like phone, mail, etc. – supports custom error messages informing what is wrong with credentials – full branding – password reset functionality (new password sent to mobile phone)
- moved change password functionality inside Korsveien with password strength meter and password policy control
Conversion basics
First steps when researching the subject will most likely point you to SharePoint Microsoft TechNet guidelines. This is a good start, we are informed that to convert to claims we should:
- know that this is an irreversible process
- change UseClaimsAuthentication flag value on web application to $true (PowerShell)
- assure our admin user is still in control of the solution by adding new “FullControl”user policy to default zone and assigning admin account to it
- execute a “magic” MigrateUsers($true) PS command
- if portalsuperuseraccount and portalsuperreaderaccount were set before conversion then you should change the values accordingly
My intention is not to describe details of claims concept as it is a vast topic and already well described on the internet. If you plan this kind of migration you will inevitably be compelled to “make friends” with all the basics. However, you may wonder what does “accordingly” stand for in the last bullet above. It means you must change the user name to claims encoding correspondent. What MigrateUsers($true) does it changes user’s logon name to claims encoding with Windows as identity provider, e.g.
i:0#.w|contoso\admin
- “i” for an identity claim
- “#” for the user logon name format for the claim value
- “.” for a string
- “w” for Windows claims
- “contoso\chris” for the identity claim value (the Windows account name)
It is up to you to decide what will be used as identifier claim. I decided it will be UPN, so in this case the second version should be placed as portalsuperuseraccount value. For further reference on different encoding please refer to SharePoint 2013: Claims Encoding – Also Valuable for SharePoint 2010 or Identity Claims Encoding for SharePoint articles.
How to change values for aforementioned portalsuperuseraccount and portalsuperreaderaccount? You can use code similar to this:
# Define new user login names$superRead = "i:0e.t|adfs provider|portalsuperreader@contoso.com"$superUser = "i:0e.t|adfs provider|portalsuperuser@contoso.com"$webApp= “https://www.contoso.com”
# Use Move-SPUser command to change user login name$user = Get-SPUser -Identity "i:0#.w|contoso\portalsuperreader" –Web $webAppMove-SPUser -Identity $user -IgnoreSID -NewAlias $superRead -confirm:$false$user = Get-SPUser -Identity "i:0#.w|contoso\portalsuperuser" -Web $webAppMove-SPUser -Identity $user -IgnoreSID -NewAlias $superUser -confirm:$false
# Update portalsuperuseraccount and portalsuperreaderaccount$wa = Get-SPWebApplication -Identity $webApp$wa.Properties["portalsuperuseraccount"] = $superUser$wa.Properties["portalsuperreaderaccount"] = $superRead$wa.Update()
I put stress on this procedure because setting this up correctly saves a lot of trouble later (access denied messages for users etc.).
ADFS + Sharepoint = Misalliance?
So far so good, yet the devil is always in the details. A list of things to be done to connect ADFS 2.0 and SharePoint:
- install ADFS
- add your SharePoint web application as a relying party in ADFS management console
- specify claim rules for the relying party
- specify SAML logout endpoint
- add ADFS server as Trusted Identity Provider
-use ADFS primary token signing certificate -use realm defined in ADFS relying party configuration -map appropriate claims -select an identity claim
- change authentication to Trusted Identity Provider -> (name you defined for your ADFS provider when adding it as TIP) for web application in Central Administration
In the Red Cross case I needed to implement “ADFS server with proxy” scenario because we had to maintain previous functionality that allowed users from inside to be logged in automatically via Windows Integrated Authentication (WIA). However, for the sake of simplicity, I am not going to describe the process here and assume that we are talking about one main ADFS instance.
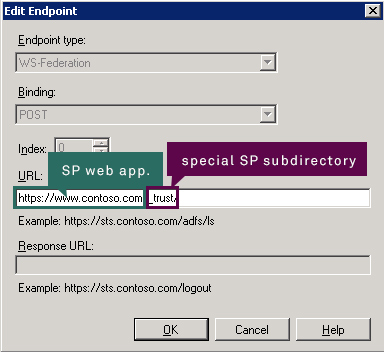
During configuration of relying party you should remember that URL for it should be built in this way:
https://<your_SP_web_app>/_trust/
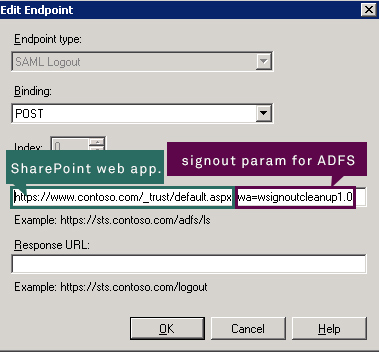
When specifying SAML logout endpoint you should remember it should consist:
- SharePoint web application address
- logout parameter for ADFS, in this case wsignoutcleanup1.0, which causes this single relying party to be signed out (if you want to log out of all RPs then you should use wsignout1.0 parameter instead)
https://<your_SP_web_app>/_trust/default.aspx?wa=<signout_param>
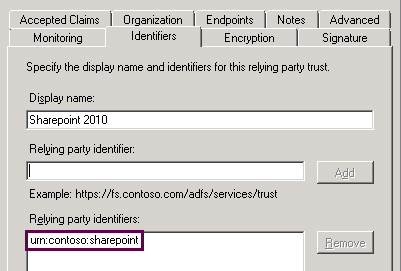
When specifying relying party identifiers you should leave just one. Later you must provide this as realm when adding ADFS instance as Trusted Identity Provider (TIP) in SharePoint. It may look like on the screenshot below:
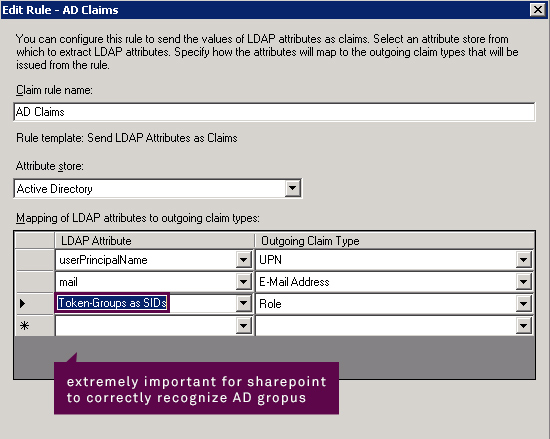
One of the last steps to do in ADFS management console is defining claim rules. What you do here is basically choosing what claims should be included in your security token and from which AD attributes ADFS should get values for them.
In the Red Cross scenario they used an often utilized technique to define permissions. They configured several SharePoint groups and added Active Directory groups to them. That is why it was crucial to assure AD groups and their members remain correctly verified by SharePoint.
To satisfy this requirement you have to include Token-Group as SIDs -> Role mapping.
If you configure claim rules incorrectly then SharePoint will not apply AD groups-based permissions as it will not be able to discover AD group members.
Now, while still in ADFS management console you should export primary token signing certificate to a file, e.g. ADFS_signing.cer and make sure you import it to Trusted Root Authority. Having all info that you need, you can execute a few PowerShell lines. To improve clarity I marked the most important variables in colours.
$cert = New-Object System.Security.Cryptography.X509Certificates.X509Certificate2("ADFS_signing.cer") New-SPTrustedRootAuthority -Name "Token Signing Cert" -Certificate $cert
$realm = "urn:contoso:sharepoint"
$map1 = New-SPClaimTypeMapping -IncomingClaimType "http://schemas.xmlsoap.org/ws/2005/05/identity/claims/upn" -IncomingClaimTypeDisplayName "Account ID" –SameAsIncoming
$map2 = New-SPClaimTypeMapping -IncomingClaimType "http://schemas.xmlsoap.org/ws/2005/05/identity/claims/emailaddress" -IncomingClaimTypeDisplayName "EmailAddress" -SameAsIncoming
$map3 = New-SPClaimTypeMapping -IncomingClaimType "http://schemas.microsoft.com/ws/2008/06/identity/claims/role" -IncomingClaimTypeDisplayName "Role" -SameAsIncoming
$ap = New-SPTrustedIdentityTokenIssuer -Name "ADFS Provider" -Description "My ADFS provider" - realm $realm - ImportTrustCertificate $cert - ClaimsMappings $map1,$map2,$map3 -SignInUrl "https://www.contoso.com/adfs/ls" - IdentifierClaim $map1.InputClaimType
As you can see here we combine several bits of information defined earlier. The last part is to set the newly created trusted identity provider as a default one for your web application (using Central Administration -> Manage Web Applications -> Authentication providers).
Convert all users and groups login names to SAML encoding
The problem is that after you “paired” ADFS with SharePoint and selected TIP as authentication provider all users and groups are still in Windows claims-encoding that is:
User Windows claims encoding:
i:0#.w|<domain>\<user>
Group Windows claims encoding:
c:0+.w|<group_sid>
Somebody may ask “So what, does it matter?”. Yes, it does.
In the earlier snippets I have selected UPN as identifier claim so right now if you log in, a brand new SP user will be created with user name like:
User SAML encoding:
i:0e.t|<provider_name>|<upn>
Group SAML encoding:
c:0-.t|<provider_name>|<group_sid>
Why and what are the consequences?
It happens because TIP-issued claims are encoded differently than Windows-issued claims.
In effect you do not preserve any former SP user settings as this one will be brand new.
Secondly, you do not have any permissions respected as these are different users from SP perspective. AD groups SharePoint logon names also need to be fine-tuned to new encoding.
What you need to do is to write a PowerShell script that will run in the web application scope and utilize Move-SPUser to change logon name encoding from Windows to SAML format for all users and groups.
In the Red Cross case this was a bit more complicated. When I was moving users I realized that in one of the domains’ users UPNs are not in a unified format. Most of people had an INT (from INTERNAL) prefix in the domain name, but some of them did not.
Your script must take all such details into consideration, otherwise your permissions will still not fully work. You should also run the script on all site collections to make sure everything is transformed correctly.
People picker, why it does literally find everything?
It is highly probable that one of the first things you will notice after conversion is that People Picker is… almighty. What I mean by that is that anything you type in the search field will be resolved successfully in the TIP section. Why is that so? It is by design, as you can read here Custom claims providers for People Picker (SharePoint Server 2010):
“When a Web application is configured to use SAML token-based authentication, the SPTrustedClaimProvider class does not provide search functionality to the People Picker control. Any text entered in the People Picker control will automatically be displayed as if it had been resolved, regardless of whether it is a valid user, group, or claim. If your SharePoint Server 2010 solution will use SAML token-based authentication, you should plan to create a custom claims provider to implement custom search and name resolution.”
As it is stated above, what is waiting for you now is creating a custom claims provider. There are multiple guides how to do that, e.g.: Fixing People Picker for SAML Claims Users Using LDAP or Claims Augmentation and Registering Your Provider.
To cut the long story short: the 2 most important methods to acknowledge to have the search functionality working again are:
protected override void FillSearch(Uri context, string[] entityTypes, string searchPattern, string hierarchyNodeID, int maxCount, SPProviderHierarchyTree searchTree)
protected override void FillSearch(Uri context, string[] entityTypes, SPClaim resolveInput, List<PickerEntity> resolved)
unless you really know what you are doing. If you change the value there without a deep consideration then when you add a “Person or group” column to any list and try to add new item or edit existing you will get:
<nativehr>0x80020005</nativehr><nativestack></nativestack>Invalid data has been used to update the list item. The field you are trying to update may be read only.
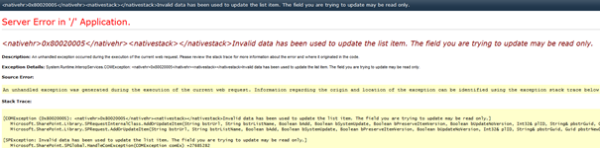
Natural thing in this situation would be googling it to check if this means anything else besides field being read-only (as we know it is not the case here). What you may find while digging into the subject is that “Person or group” columns works with User Information List “under the hood”. If you take a look at this lookup list and the way user info is retrieved you may eventually come to a conclusion that something is broken in your custom claims provider and this something is the UserID being set manually. Just leave unmodified and you will save yourself a lot of time.
Granting permissions to users "does not work"
Another essential elements to pay attention to are permissions granted to user to access a particular site collection. You may notice that when you add permissions for users to a site collection everything seems to be working fine but… You just cannot see them on the direct permission list or in a SharePoint group after adding them. Now, some of us may pull their hair out in such situation as nothing is registered and no critical exceptions are thrown. Newly added users or groups are simply not showing up. This may happen in all site collections that were created prior to conversion.
The solution is to write another PS script that will ensure all users (in new SAML claims encoding) in all site collections. You may have just thought: “It will take some time to execute such script in bigger solutions”. Yes, in case of the Red Cross it took about 5 days. The structure of the script itself is very simple. Iterate over all site collections, get their SPWebs and execute:
$<the_sp_web>.EnsureUser(<username_in_SAML_claim_encoding>)
Users lost access to their mysites or have new mysites
In case of user profiles you must remember to KEEP all User Profile Service related DBs except the SyncDB (which usually needs to be re-created along with new User Profile Service Application). You should also BACK UP all MySite URLs with respective user names.
Check if MySite owner and administrator is correctly migrated to SAML claim encoding.
If new site is generated you should set the previous address using the backed up file with MySite URLs and user names. To change user MySite URL you must change PersonalUrl attribute value on user profile. Here is a short snippet (the PS console must be opened as farm Administrator):
$site = Get-SPSite <site_URL>$context = Get-SPServiceContext $site$profileManager = New-Object Microsoft.Office.Server.UserProfiles.UserProfileManager($context)
#Get user profile and change the appropriate attribute$up = $profileManager.GetUserProfile(<username>)$up[“PersonalSpace”].Value = `
Then you should make sure that user in SAML claim formatting is the owner and administrator of the page. You can achieve that by executing:
Get-SPSite <mysite_URL> | Set-SPSite –OwnerAlias <username>Get-SPSite <mysite_URL> | Set-SPSite –SecondaryOwnerAlias <username>
Search is not crawling
This more commonly known problem in SharePoint 2010. After conversion to claims, content is no longer crawled. This is caused by the crawler not being able to work in claims mode, only in classic Windows authentication. What you have to do is to extend the web application to another zone, e.g. “Internet” or “Custom”. Just make sure to have it on the most exotic port you can think of, so nobody hits it by accident. Then make sure you have search results mapped to main web application.
Adding tasks to Sharepoint list from Outlook 2010 is not working
Adding tasks to SharePoint lists may not work and it is no accident that you see it just after the point regarding extending web application to enable search crawling again. The thing is that it may not work for two reasons:
- you do not have Office 2010 hotfix package (Mso-x-none.msp) installed (it adds ADFS log in ability to Outlook 2010)
- you extended your web application to “Intranet” zone. The thing is that Outlook hits “Intranet” zone first, not “Default”. Extend your app to any other zone than “Intranet”, e.g. “Custom” and it should work
##SIGN IN AS DIFFERENT USER AND SIGN OUT To make sign out and sign in as different user working again you have to modify Welcome.ascx control in SharePoint hive. I changed the IDs and added appropriate values for ClientOnClickNavigateUrl for Logout and LoginAsDifferentUser MenuItemTemplates.
Make sure you have a backup of Welcome.ascx!
The changes may look like on a snippet below (important parameters to change marked in red):
<SharePoint:MenuItemTemplate runat="server" id="ID_Logout1"
Text="<%$Resources:wss,personalactions_logout%>"
Description="<%$Resources:wss,personalactions_logoutdescription%>"
MenuGroupId="200"
Sequence="300"
UseShortId="true"
ClientOnClickNavigateUrl="https://www.contoso.com/adfs/ls/?wa=wsignoutcleanup1.0"
/>
<SharePoint:MenuItemTemplate runat="server" id="ID_LoginAsDifferentUser1"
Text="<%$Resources:wss,personalactions_loginasdifferentuser%>"
Description="<%$Resources:wss,personalactions_loginasdifferentuserdescription%>"
MenuGroupId="200"
Sequence="100"
UseShortId="true"
ClientOnClickNavigateUrl="https://www.contoso.com/adfs/ls/?wa=wsignoutcleanup1.0&wtrealm=urn%3acontoso%3asharepoint&wctx=https%3a%2f%2fwww.contoso.com%2f_layouts%2fAuthenticate.aspx%3fSource%3d%252F&wreply=https%3a%2f%2fwww.contoso.com%2f_trust%2fdefault.aspx"
Keywords are gone on all lists
If you were using Metadata Service and created terms then you may face a situation where all keywords “disappear” in certain columns. This is because of permissions for “All authenticated users” given to TaxonomyHiddenList that is used by Sharepoint to show keywords on lists. What you have to do is migrate “All authenticated users” user logon name to SAML claims encoding. Then users will be properly recognized and keywords will be available in appropriate columns. Below you can see how it should be changed:
Windows claims encoding
c:0!.s|windows
SAML claims encoding
c:0(.s|true
Is that all?
There are many complications of different scale and nature you may have to confront when converting SharePoint 2010 solutions from classic Windows authentication to claims-based counterpart, especially when you apply trusted identity provider like ADFS. To know all the ins and outs it’s best to do it yourself. This short extract from my experiences hopefully should get you started and set on the right course.
Implementation, deployment and finding fixes for many strange, sometimes difficult dilemmas was an incredibly interesting and educating experience. It was worth the effort. It was also all that Making Waves provides: I met some great people, travelled to interesting places, solved hard problems and benefited from team collaboration of skilled and enthusiastic professionals!
Reference materials
Microsoft whitepapers
- Implementing Claims-Based Authentication with SharePoint Server 2010
- A Guide to Claims-Based Identity and Access Control (2nd Edition)
Internet articles, guides, interesting projects
- How to configure AD FS v 2.0 in SharePoint Server 2010 (and 2013)
- Configuring SharePoint 2010 and ADFS v2 End to End – Share-n-dipity
- Writing a Custom Claims Provider for SharePoint 2010 – Part 1: Claims Augmentation and Registering Your Provider
- Claims Walkthrough: Writing Claims Providers for SharePoint 2010
- Claims Walkthrough: Creating Claims Providers for Trusted Login Providers for SharePoint 2010
- Checklist for Issues with Custom Claims Providers in SharePoint 2010 and 2013
- LDAP/AD Claims Provider For SharePoint 2010

Book expert consultation!
If you want to talk to our experts about this article or related question – just reach out!
Author

Related articles
![A well-crafted prompt doesn’t just work once. It works across teams, channels, and campaigns. It can be tweaked for new use cases and refined based on what performs best.]()
June 27, 2025 / 4 min read
Prompts are marketing assets: how to reuse, and scale them
Prompts aren’t throwaway lines. They’re repeatable, scalable assets that can streamline your marketing your team’s output. Learn how to build a prompt library that delivers.
![Woman using a wheelchair in the office settings]()
June 17, 2025 / 5 min read
What is accessibility and why it matters?
Accessibility ensures everyone — including those with disabilities or limitations — can read, navigate, and engage with your content equally.

